K
Kris
Guest
- Thread Author
- #1
Working peyote stitch with 2 sizes of beads is the trick to creating the soft, curving shape of these earrings. I chose to use the same color of bead for the entire piece to focus on the form, but using two different colors would create a great colorblocked effect. These beaded earrings work up quickly, so it would be fun to test out a variety of color palettes.


Supplies:
I used the same color in two different sizes of seed bead – Toho #741.

The rectangle is 12 beads wide. I used doubled Nymo thread because it takes some pulling to get the curve to fall into place. Start with a long piece of thread doubled, add a friction bead with enough thread behind it to weave in, then add 13 of the small beads.

Go back through the third bead from the needle end.

Work even count peyote until you have 6 rows (three beads at each end.) If you’re unfamiliar with peyote stitch, check out this peyote stitch ring tutorial.


Just like in the peyote stitch ring tutorial we now want to zip up the rows of beadwork into a very tiny tube.

Zig zag back and forth , following the same peyote stitch pattern.
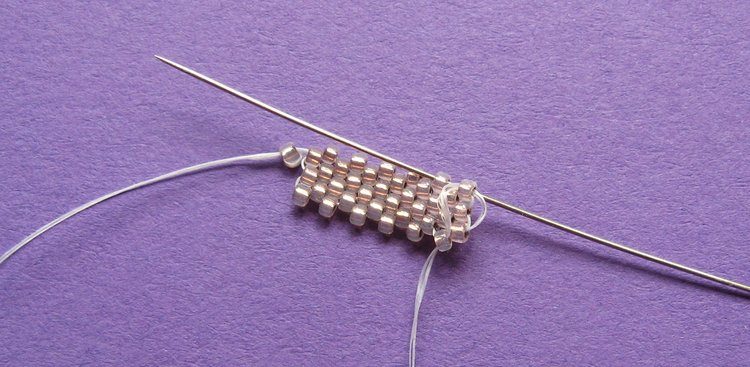


When you get to the end, go down through the end bead of the next row over….
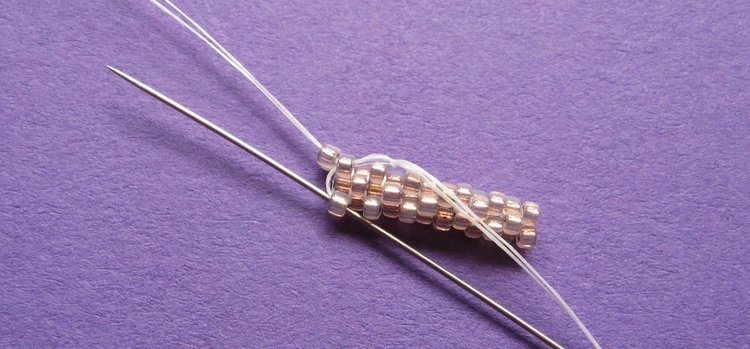
Then back up through the end bead from the zipping row to hold the seam together.

Now add a row of peyote in the 3rd dimension – along the edge of the tube.


It should look like this at the end. This is now the row we’re working from.

Now we want to add a tiny hole to put a jump ring through. Add the first bead of the row like usual, then instead of adding a second bead, stitch through the bead that would be under it.

Then up through the next bead, as through you added a bead in that gap, even though you didn’t.

Finish the row like normal.
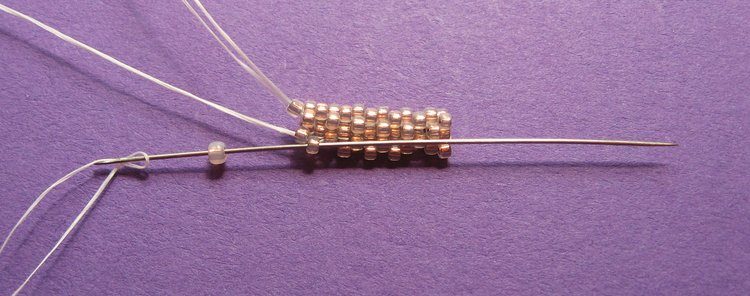
At this end, use one of the large beads for the first bead of the row. Stitch normally to the gap spot.

Add 3 beads in the gap left for the jump ring.

Add the first bead of the row like normal, then go through all 3 beads. (Tighten it up, of course, I just have it loose so it’s easy to see.)
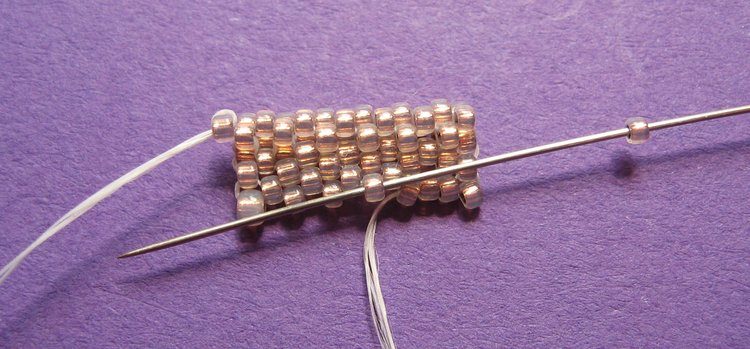
Stitch the rest of the row, up to the last gap.

Then add a big bead at the last gap.

This time, the first 2 beads of the row should be big beads.
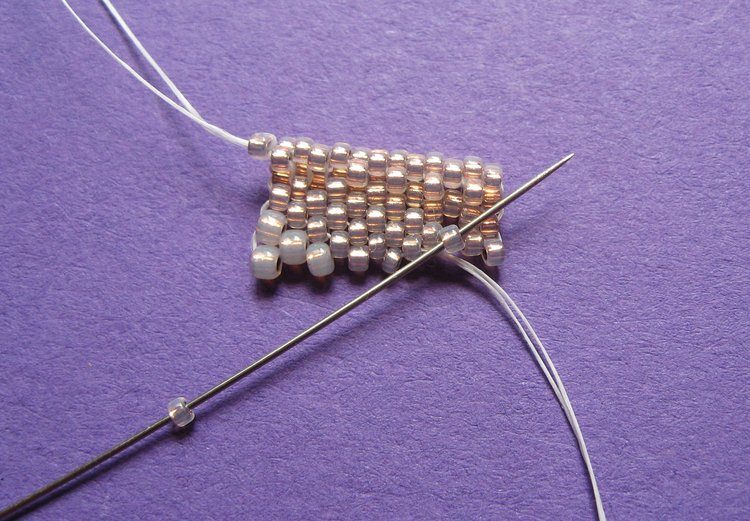
At the gap point, add a bead in the normal spot, go through the center bead of the 3 bead group…

then add a bead in the next gap like normal. The row is now back in order, and the little hole is there to make it easy to hang the finished piece.

Now carry on with normal peyote, but with the section of large beads shifting over 1 bead each row.


Eventually the whole row will be large beads.
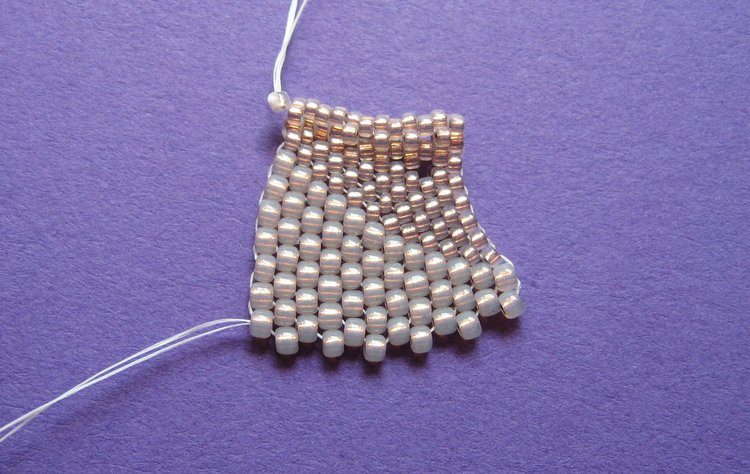
Add 2 more rows of large beads.

Then a row of the small beads.

And another row of small beads, being sure to pull both rows up as tightly as you reasonable can. (Don’t go wild, you don’t need to break the thread. Just try to eliminate any gaps that you can.)
This is the point that determines which is the front and back – to make a symmetrical pair of diamonds be sure one piece curls up as shown, but for the other one you flip it over before pulling these rows tight.

Add 2 more rows of small beads. You can stop here if you’d like, and weave in your threads.


If you want the curve to be a little more dramatic, add 2 more rows of small beads (6 rows in total) and zip up the small rows like you did at the start. This is tricky, though, so feel free to skip it if you’d like.
Remove the friction bead and weave in your threads at both ends. Trim the tails.

Use a jump ring or two to attach them to the earhooks, and you’re done!

The post Curved Diamond Beaded Earrings appeared first on How Did You Make This? | Luxe DIY.
Supplies:
- 11/0 seed beads
- 15/0 seed beads
- beading needle
- beading thread
- earhooks
- jump rings
- sharp scissors
- jewelry pliers
I used the same color in two different sizes of seed bead – Toho #741.
The rectangle is 12 beads wide. I used doubled Nymo thread because it takes some pulling to get the curve to fall into place. Start with a long piece of thread doubled, add a friction bead with enough thread behind it to weave in, then add 13 of the small beads.
Go back through the third bead from the needle end.
Work even count peyote until you have 6 rows (three beads at each end.) If you’re unfamiliar with peyote stitch, check out this peyote stitch ring tutorial.
Just like in the peyote stitch ring tutorial we now want to zip up the rows of beadwork into a very tiny tube.
Zig zag back and forth , following the same peyote stitch pattern.
When you get to the end, go down through the end bead of the next row over….
Then back up through the end bead from the zipping row to hold the seam together.
Now add a row of peyote in the 3rd dimension – along the edge of the tube.
It should look like this at the end. This is now the row we’re working from.
Now we want to add a tiny hole to put a jump ring through. Add the first bead of the row like usual, then instead of adding a second bead, stitch through the bead that would be under it.
Then up through the next bead, as through you added a bead in that gap, even though you didn’t.
Finish the row like normal.
At this end, use one of the large beads for the first bead of the row. Stitch normally to the gap spot.
Add 3 beads in the gap left for the jump ring.
Add the first bead of the row like normal, then go through all 3 beads. (Tighten it up, of course, I just have it loose so it’s easy to see.)
Stitch the rest of the row, up to the last gap.
Then add a big bead at the last gap.
This time, the first 2 beads of the row should be big beads.
At the gap point, add a bead in the normal spot, go through the center bead of the 3 bead group…
then add a bead in the next gap like normal. The row is now back in order, and the little hole is there to make it easy to hang the finished piece.
Now carry on with normal peyote, but with the section of large beads shifting over 1 bead each row.
Eventually the whole row will be large beads.
Add 2 more rows of large beads.
Then a row of the small beads.
And another row of small beads, being sure to pull both rows up as tightly as you reasonable can. (Don’t go wild, you don’t need to break the thread. Just try to eliminate any gaps that you can.)
This is the point that determines which is the front and back – to make a symmetrical pair of diamonds be sure one piece curls up as shown, but for the other one you flip it over before pulling these rows tight.
Add 2 more rows of small beads. You can stop here if you’d like, and weave in your threads.
If you want the curve to be a little more dramatic, add 2 more rows of small beads (6 rows in total) and zip up the small rows like you did at the start. This is tricky, though, so feel free to skip it if you’d like.
Remove the friction bead and weave in your threads at both ends. Trim the tails.
Use a jump ring or two to attach them to the earhooks, and you’re done!
The post Curved Diamond Beaded Earrings appeared first on How Did You Make This? | Luxe DIY.